Monday, May 20, 2013

Guest Bathroom: Before and After

Our guest bathroom was the second main project that we tackled in our home.  We started with a functional bathroom... and that was about all.  The flooring was a cheap vinyl sheet with random stains from the prior owners.  The color was a drab brown that made the room look small.  The vanity was just dreadful.  The room was ugly, and it needed some love.  We decided to tackle the project ourselves.  So we painted, laid new porcelain tile, changed out the vanity, installed new hardware, and hung a few floating shelves to display pretty accessories.  Here's where we started:


I hated that paint color.  It reminded me of something that would belong inside a Diaper Genie, not on your walls! 

And you had to love the builder grade vanity cabinet with white chipped laminate counter and almond above mount sink.  Just beautiful.


Laying the tile took a lot of patience, but Lee and I figured it out pretty quickly.  We chose a brick pattern for our tile, and were impressed with our results (even if it isn't perfect).
 After adding all of the finishing touches, like quarter round, decorative accessories, etc., we ended up a great new bathroom.  And we did it for a reasonable price since everything was done ourselves.  We are so pleased with our final results!

These floating shelves are one of my favorite parts of the room! 


It is still a work in progress, but I am much happier with our hall bath now.

Saturday, May 11, 2013

DIY Rope Mirror {Ballard Knock-off}

Lately, rope has became pretty popular in home decor magazines.  Pottery Barn and Ballard Designs both have several pieces made of either rope or jute.  I decided to follow trend and add a rope mirror to our dining room, but after browsing online, I was disappointed with the prices I found.  I don't think I have ever spent more than $50 for a mirror in my life, so I definitely wasn't going to spend $259 for this Ballard Designs beauty.
Ballard Designs - $259

We have had a round mirror hanging in our dining room since we moved in.  I bought it a few years back when we first moved into our home.  It was $29.99 at HomeGoods.  At the time, I wasn't crazy about it, but I was looking for something to fill the wall space above our buffett, and it was such a good price. So I bought it, and hung it up, and every few months, I would try and find another cheap and better looking mirror to replace it.  But I never found anything I liked.  So the mirror stayed.


After finding the Ballard Designs mirror that I loved, I decided to try and knock-off their jute rope mirror using my gold, granny floral mirror.  I bought a bag of 50 ft Manilla Rope from Lowe's for $8.29.  I convinced my husband to spend an hour on a Saturday afternoon helping me hot glue rope onto the round mirror we already owned.  I wasn't concerned if it didn't look great - I already didn't like our mirror.  Worst case scenario: I could take a trip to HomeGoods and find something else! 

We moved in a circle around the mirror, creating a new starting and stopping point with each loop to stagger the ends so they wouldn't be as noticeable.  10 mini glue sticks later, we were finished!  


The mirror isn't perfect, but I think it turned it pretty well!  I later found this mirror from HomeDecorators for $199, and I think our versions is a dead ringer (not to mention for $160 less)!

Home Decorators Mirror - $199

And for a comparison:


Sunday, January 13, 2013

Our Master Bedroom

One of the first rooms we tackled when we purchased our home was the Master Bedroom.  I wanted to have that room completely finished (or atleast somewhat finished) before our wedding.  I didn't want to spend our first night in our home in a construction zone.  Lee and I recruited my parents to help us paint this room a few weeks before we said "I do".  Along with their help, we were able to move the bed into the room, as well as the other large furniture pieces.  When we got home from our honeymoon, we were able to spend the night in our bedroom, even if it was not completely finished.  Unfortunately,  the room stayed that way for a while, nothing on the walls, no curtains, nothing to make it look "lived in."  I finally had enough of the unfinished space and decided to complete our bedroom.  Of course, no room is ever "finished,"  but this one looks a whole lot better than where it started!

Here is the room when a few days before we closed on the house:

And here's the room now:


And because I love before and after pictures:

We are very happy with our bedroom now!  And even happier that we did the renovation on the cheap!

Thanks for visiting!
-Gina 

Tuesday, December 11, 2012

It's Beginning to Look a Lot like Christmas!

Christmas is my absolute favorite time of the year!

Even though I get tired of fighting crowds in stores while shopping for gifts, and exhausted after spending HOURS and HOURS decorating our home, Christmas just brings a joy to my heart.  It really is the hap, happiest season of all.  We spend a lot of time during the Christmas season reflecting on how much we have to be thankful for.  Our home is definitely one of those things.  I always love our home, but during Christmas, I think I love it just a little more.  No matter how bad of a day I have had, I can't help but smile when I see all of our lights glowing around our home.  Here is a glimpse of our home decked out for the holidays. 

Living Room


Our Nativity


Dining Room
Kitchen 


Doesn't it just look so cheerful!
Thanks for stopping by!
-Gina


Tuesday, December 4, 2012

JOYful Door Decor

Hey y'all!  How is it already December?!  CRAZY!  I am sure everyone is feeling the holiday rush right now!  I know we are.  Lee and I have spent every minute of our few days off trying to get our home holiday ready.  And I am very happy to say that we are nearly finished.  Just in time to enjoy it for 21 days and then take everything down....Ha!  Oh well! 

I wanted to share this adorable door hanger that I made with the help of my mom a few nights ago.  I started by purchasing some plain wooden letters from Hobby Lobby.  I painted them with Candy Apple Red acrylic craft paint. 


It took about 3 coats of paint to get the letters completely covered.


 Once I the final coat of red paint dried, I used a Q-tip and some white craft pain to randomly paint polka dots on both the "J" and the "Y."  I decided to make paint the "O" in candy-cane stripes.  I used paper masking tape to mark off varying widths of stripes, which I then painted white.  I pulled the tape off immediately and used a thin paint brush to clean up any rough edges on the stripes. 


To turn my cheerful letters into a door hanger, I simply hot glued some Christmas ribbon between each of the letters.  I then used some gold ornament hanger threads tied together to make a loop hanger, which I hotglued to the back of the J.  A Command Hook holds the door hanger in place.

I am just so pleased with the way this turned out.  Polka Dots and Stripes are two of my favorite things, and this door hanger perfectly combines those two patterns!  It took no time at all and really adds a lot of Christmas cheer to my kitchen! 

Have you been making any Christmas crafts lately?

Thanks for stopping by!
- Gina

Monday, October 15, 2012

Tasty Tuesday: 5 Minute 5 Star Nutella Peanut Butter Pie

This recipe is so quick and easy. It is perfect to make if you need a go to dessert!  FYI: it makes 2 pies.  You can half the recipes if you prefer to only make one.  (Once you taste it, I am willing to bet you will make both :)


Ingredients:
2 (9 inch) store bought Graham Cracker pie crusts (may substitute for Oreo pie crusts)
1 8 oz block softened cream cheese
3/4 cup Creamy Peanut Butter
3/4 cup Nutella 
1 cup Powdered Sugar
1 16 oz. container of Cool Whip
Semi-sweet chocolate chips
Chocolate Flavored syrup


In a mixing bowl, cream together softened cream cheese, peanut butter, powdered sugar, and Nutella.  Once combined, add in 8 oz. Cool Whip, slowly combining until mixture is smooth

  
Now, stir in semi-sweet chocolate chips.  You can use as many or as few as you like.  I typically use about 1/2 cup.  


Divide mixture equally between each pie crust.


Use the remaining 8 oz. of Cool Whip to "frost" each pie.


Decorate the top of each pie with chocolate flavored syrup.  You can create a pretty pattern by swirling the chocolate syrup in a circular fashion from the center of the pie and working outward.  Next, using a pointed kitchen knife, lightly pull the syrup to create "stripes".  Continue using your knife to pull the syrup in different directions, alternating upward and downward strokes until you reach the following result. 
Chill for atleast 2 hours, serve, and enjoy!


Happy Snacking!
-Gina

Thursday, October 4, 2012

From Sidewalk Shab to Fall Fab: Using Window Panes as Decor


Lately, window panes are popping up everywhere as whimsy decoration!  There are so many cute ideas on Pinterest and other blogs, like these window pane eye candies:


Book display window pane via The Farmer & The Southern Belle


Pinned Image
Window Pane Photo Frame (source not listed)
One day, my husband and I were driving around, and I spotted a collection of window panes on the sidewalk outside of a local consignment shop.  I convinced him to turn around so that I could browse their selection.  He looked at me like I was crazy, but I persuaded him.  I spotted this window and decided it was in pretty decent shape, just needed a lil' TLC and some elbow grease (and Clorox clean-up.... and Windex...and maybe a scrubber pad or three), but I just knew it had potential.  So I picked it up for the bargain price of 10 bucks.
Now I just had to figure out what to do with it.  I saw these photos online of some cute window pane decor at The Simple Things and June & Bear, where I got inspired, finally deciding to use my pane as a backdrop for some more fall decor!
Inspirational Halloween Mantle via The Simple Things
Neutral Fall Mantel via June & Bear
I cleaned up my the window, and touched up a few rough patches with some acrylic paint.  I decided that I did like the more "rustic look" and grabbed some sand paper to lightly roughen up the areas that looked a bit too perfect.  When I was happy with the look, I got my handy hubby to attach a picture hanger to the back of the frame.  I then hung it on the wall in place of my usual large clock above a console table.  She was lookin' pretty good, but she needed some accessories!  Off to the craft store I went.  I decided on a rustic fall wreath of twigs and berries (that was on sale for $3 bucks!!!)  I then took some extra burlap from my DIY burlap banner and used it to attach the wreath to the window pane.  And there you have it, a super inexpensive way to create a fall vignette.


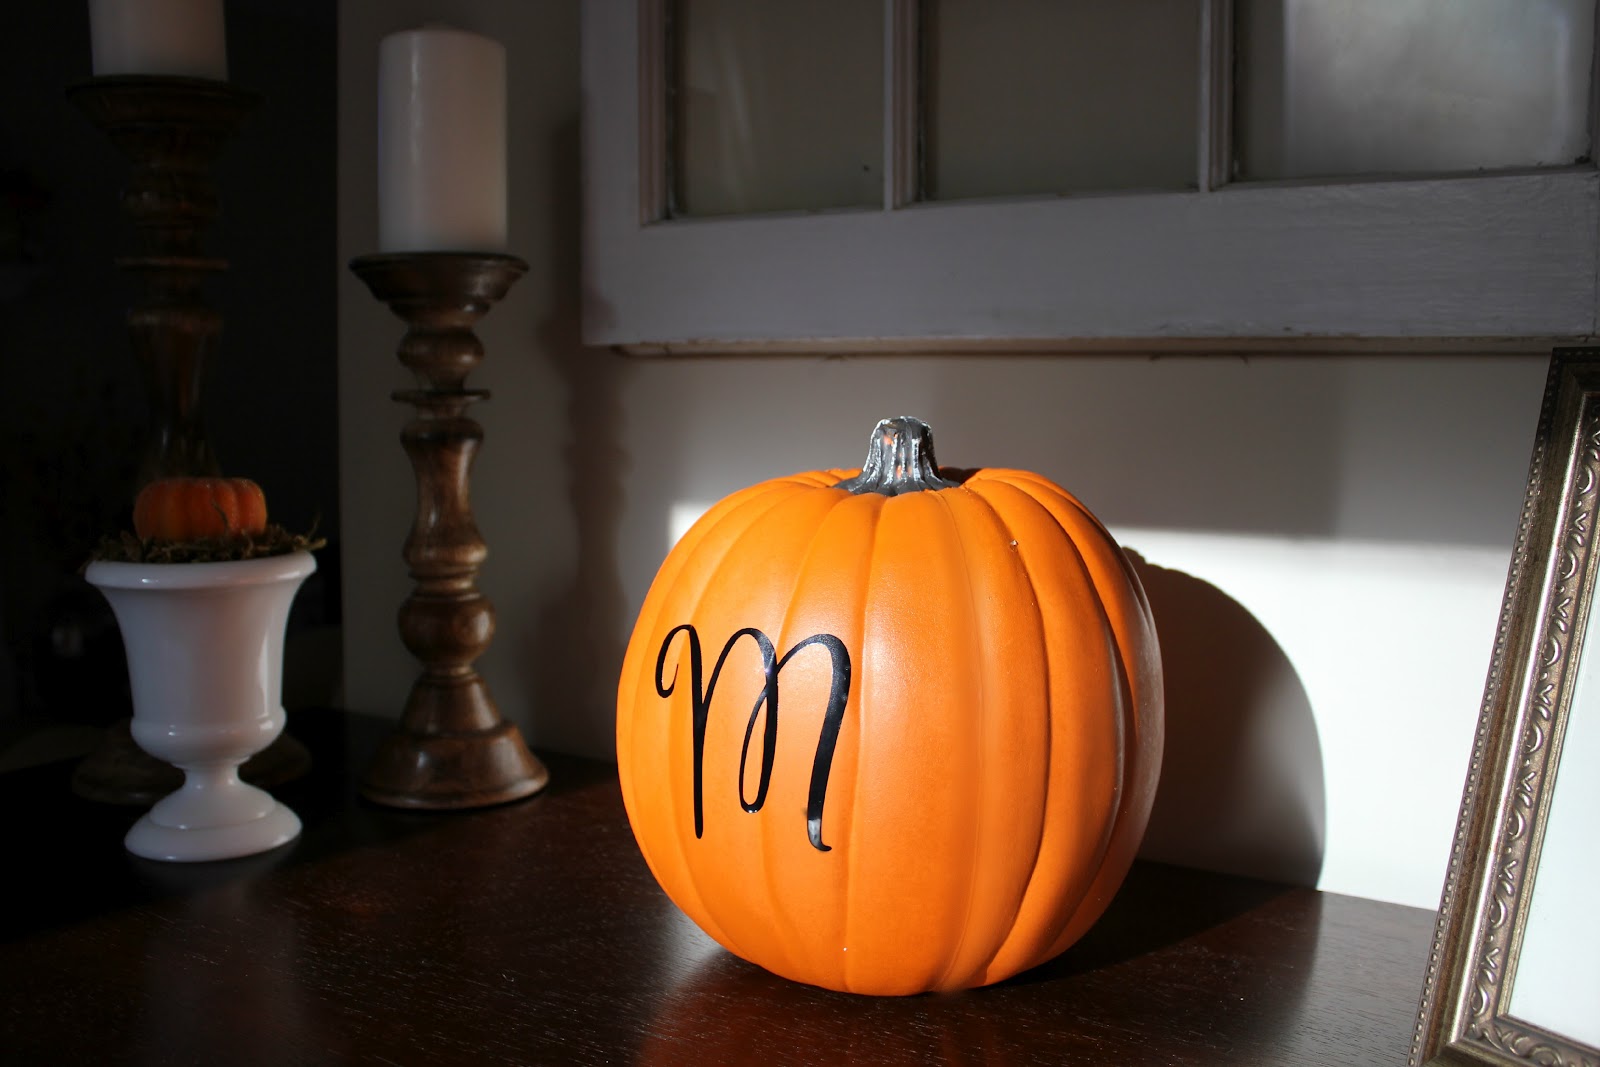
I shopped my house to add some extra decor to the table beneath my fabulous window pane:  Some wooden candlesticks that I found on clearance at Hobby Lobby a while ago, a thrift store milk glass vase filled with dollar store moss and a small sparkly pumpkin on top, a "rustic" looking picture of hubby and myself from our engagement pictures a few years ago, and a monogrammed craft pumpkin that I created for cheap using a vinyl letter purchased at a craft store.


I must say I am pretty pleased with my tablescape.  It adds the perfect amount of fall warmth to this small section of our home.  And considering it all came from a piece of sidewalk trash treasure.  Have you created anything with window panes lately?  You should try it! The possibilities are endless.
~Enjoy your day~
- Gina

Linking up with:
My Repurposed Life


Related Posts Plugin for WordPress, Blogger...